
Ideas for Covering Up Tile Floors Without Removing It
There's many projects I bravely dive into head first in the pursuit of saving money, and while the labor behind it might be tedious, the outcome is always worth it to me. There's actually very few things I won't do or try at least once and in most cases I end up enjoying it so much- I won't shy from doing it again & again.
However, there's a very short list of things I leave to the professionals and they include:
1) Painting (seems so simple right? I hate the prep-work, painter's tape, and I rather just pay someone to have those perfect lines.)
&
2) TILE REMOVAL
Have you ever ripped up a tile floor?
Plain & Simple:
IT SUCKS
In fact, it more than sucks. It's my least favorite thing to do EVER (even more than that time we decided to switch out all of our landscaping mulch for river rock and Shad enlisted me as the only help to move 27 tons of rock with none other than a wheelbarrow and our bare hands).
Whenever I think of removing tile, I think back to our kitchen renovation 2 years ago. Shad and I spent two days ripping this terrible tile out, only to have the hard cement tile adhesive left behind. With only 24 hours left until the hardwood floor guys were showing up to install our new floors, we rented a cement grinder to get rid of the adhesive on the floor. I not only looked like a survivor walking out of the ashes of ground zero, our house was an absolute mess of dust and all I tasted for a week when I swallowed was tile adhesive.


Needless to say, if we can avoid removing tile , and saving our house from the absolute mess that seeps through protective plastic barriers- we will. So when it came to the guest bathroom upstairs, for which I despised everything from the layout, to the sink, to the tile floor- I would do anything to not have to remove and replace the tile. I couldn't forget removing that kitchen floor so much- that I convinced myself leaving the floor as it was and making other changes would satisfy me enough.

In phase 1, we changed out the bathroom sink (which btw is still available on HomeDepot.com for under $600) . This made my mind comfortable for about a month. In Phase 2, I decided to shiplap the "cove", thinking that would make me feel better (see my other blog post here for shiplapping). Which it did... for a while. But as I walked by this bathroom on a daily basis- the floor just kept bothering me.
So that's when I scoured the internet for solutions to lay over the tile instead of removing it.
Here are three ideas I came across that I considered:
1. Paint the tile with a stencil.
2. Lay Groutable Vinyl Peel & Stick Tile Flooring over the tile.
3. Lay Pergo XP (with moisture lock) over the tile as a floating floor.
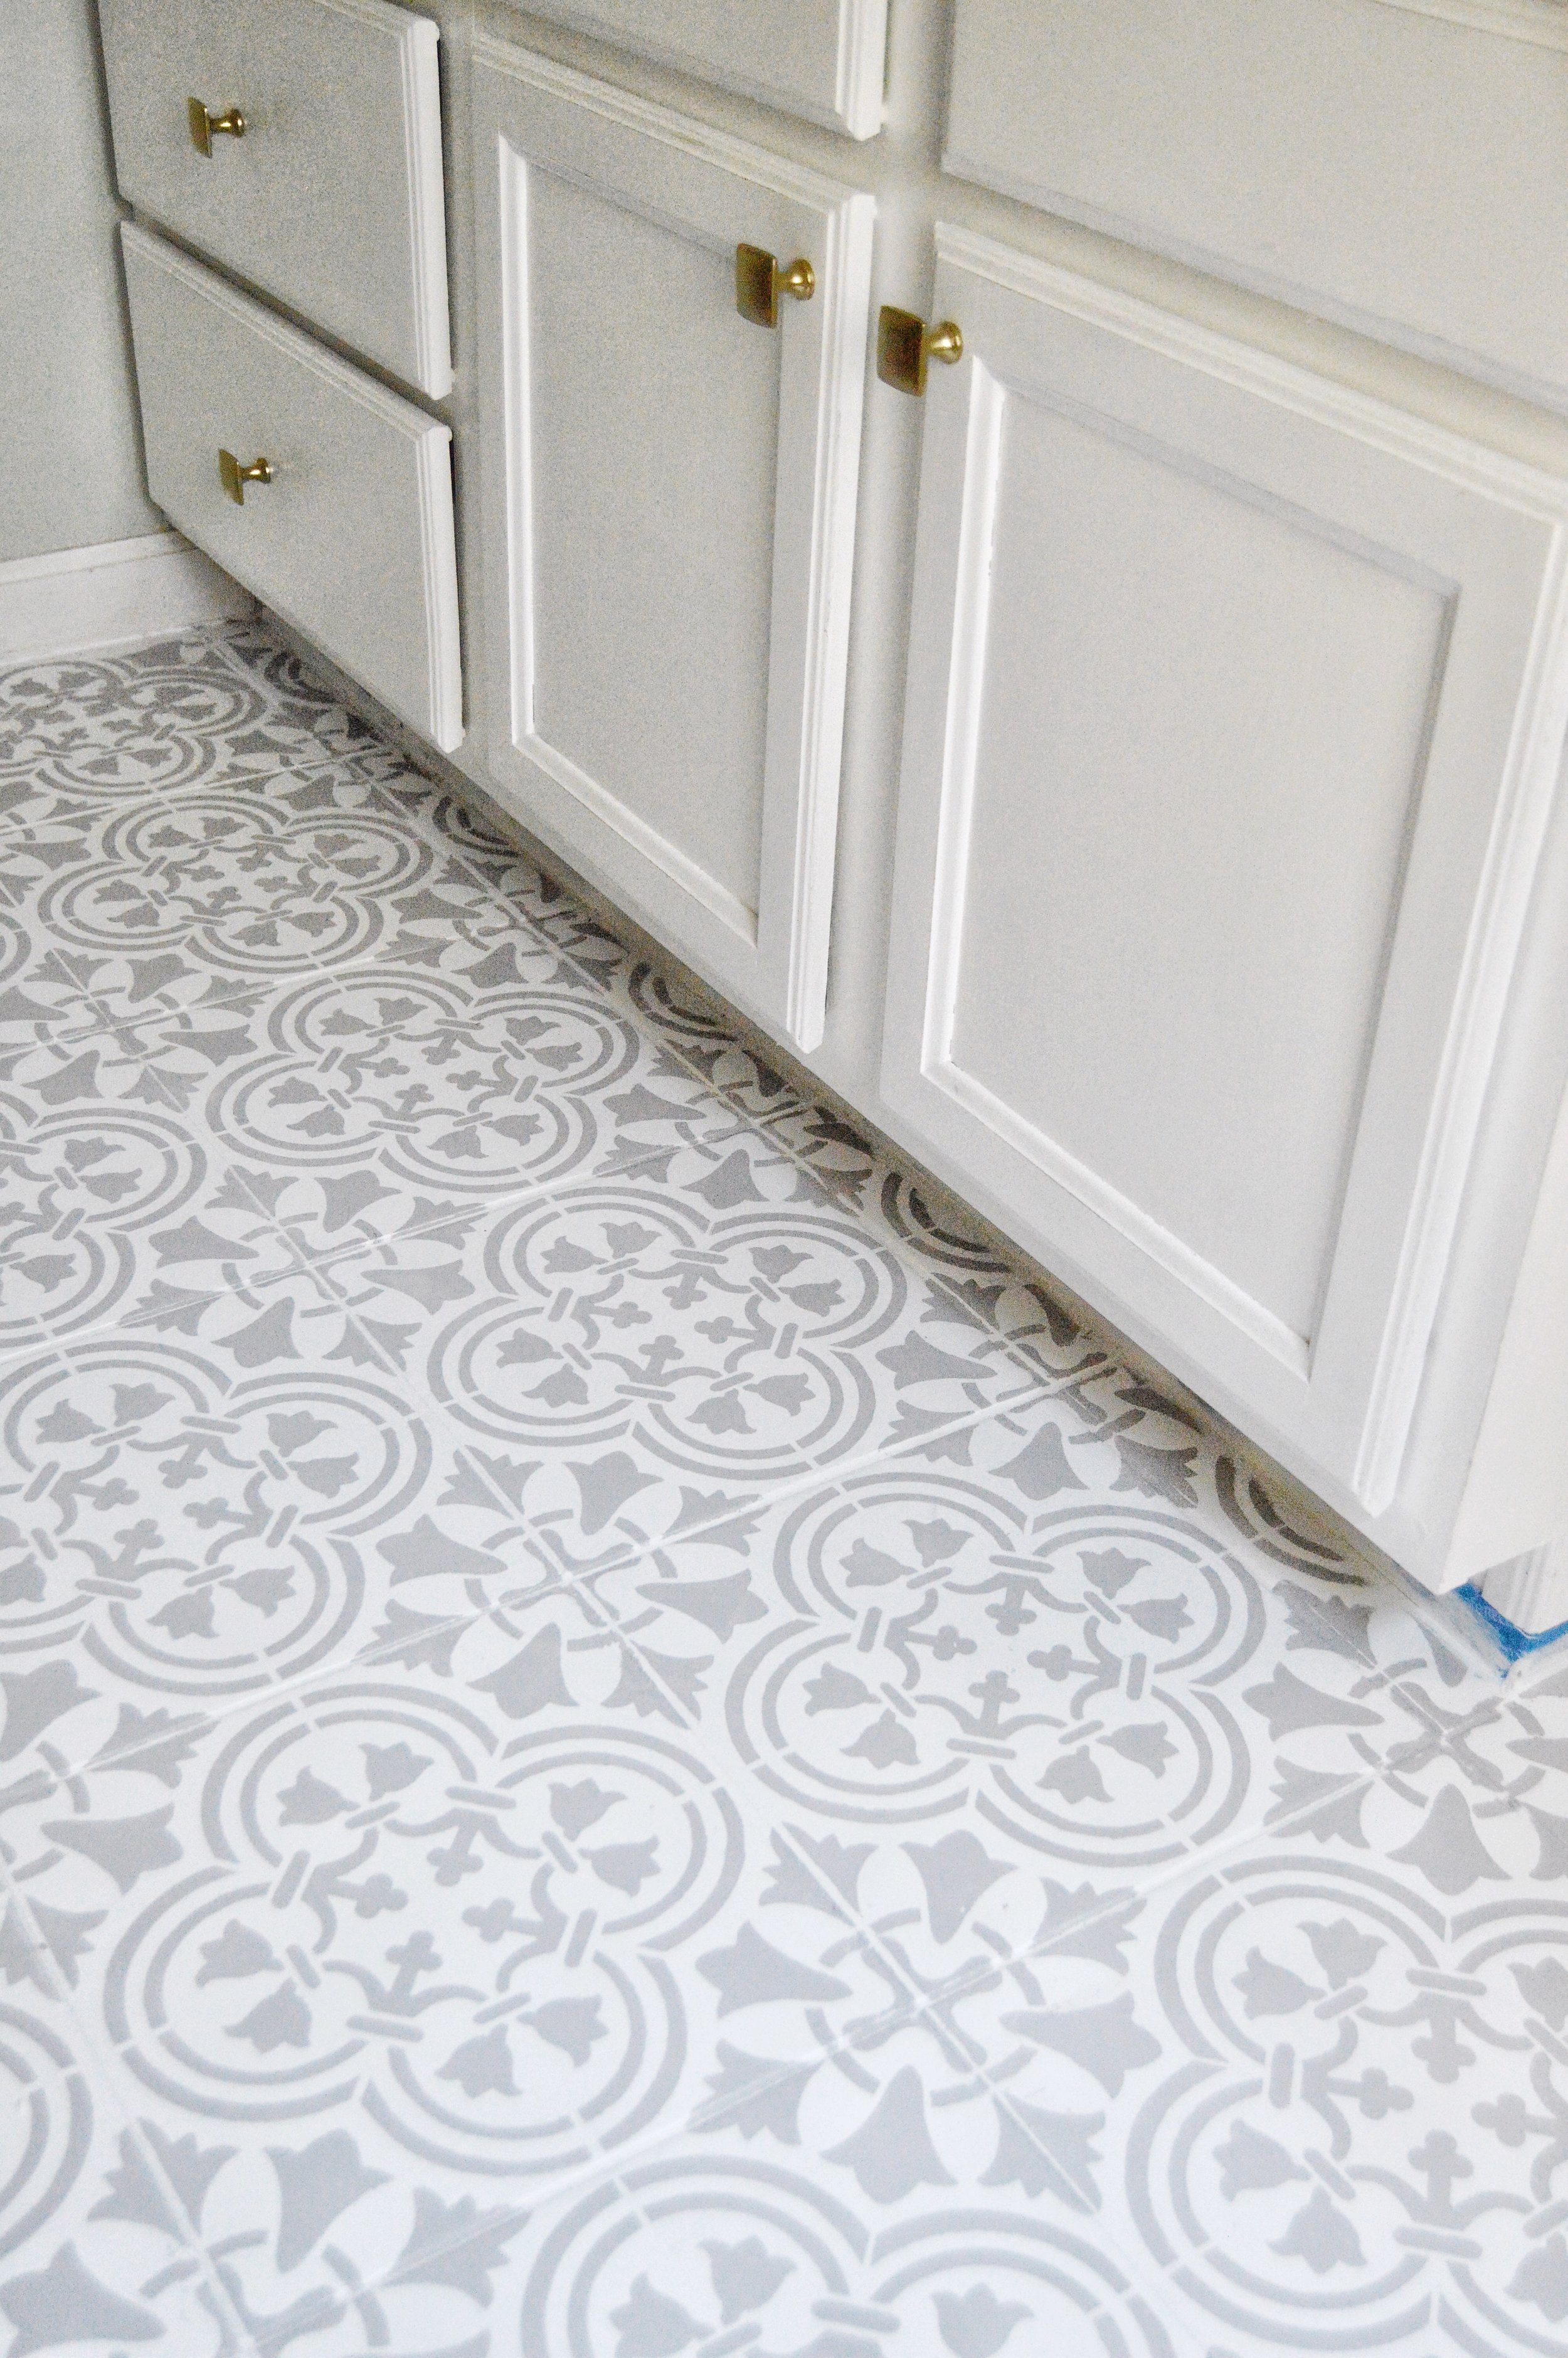
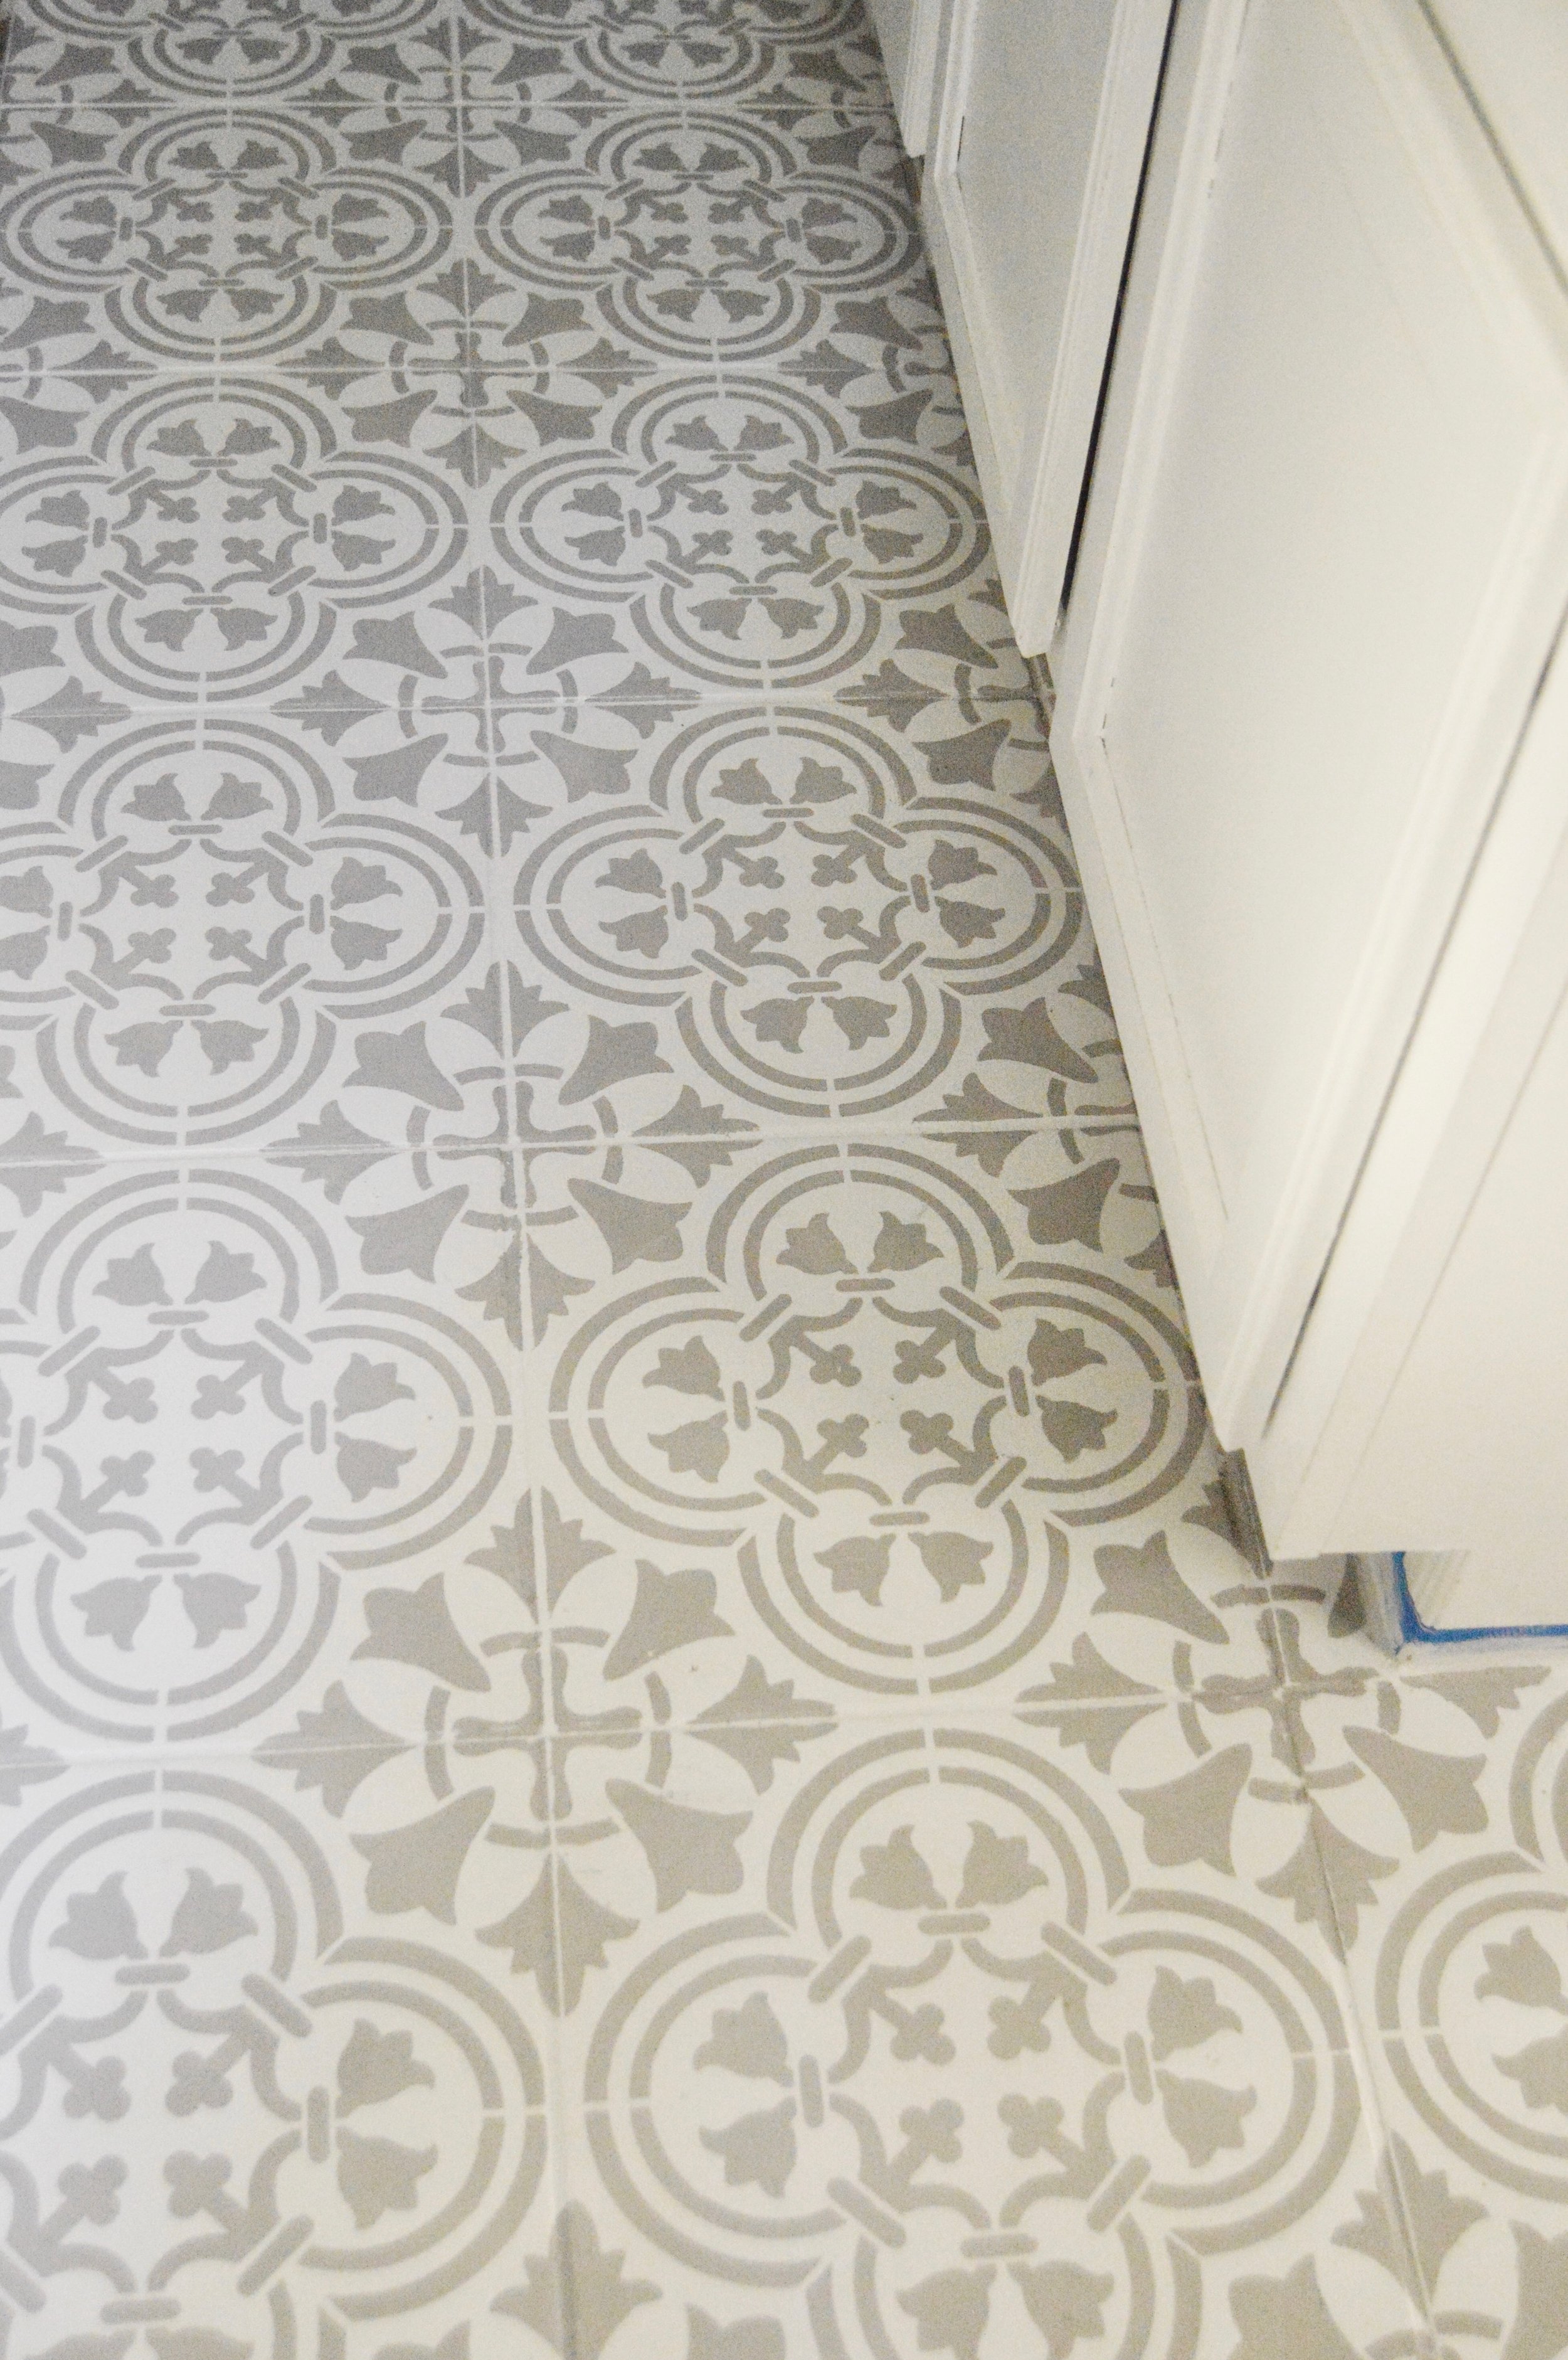
Idea 1: Paint the tile with a stencil


Can you believe this is paint? I came across this idea through my friend Courtney. She lives in PA and we often text each other to throw around decorating ideas. She knew how badly I wanted to change out my tile, but didn't want to remove it. So she sent me this idea. Basically what you do, is order a stencil online to the size of one of your tiles and apply that stencil with paint to each tile.
What I love about it: It plays on the trend of fun mosaic tiles that are now seen in bathrooms, kitchens, and mudrooms, all while staying budget-friendly, since the only costs are stencils and paint.
Why I didn't try it: As I mentioned above- I hate painting and as I read in the blogs mentioned in the photos above- it was very tedious and time consuming. I was also left with many questions like: Will it last over time and not chip after all the time I spent completing the project? Did continued use of the stencil cause it to get messy? Lastly, if I messed it up I felt that I'd be left with no option but to remove the tile after all. These ladies did amazing jobs- but since I'm not the best painter, I searched for another option.
My Friend Jessica over at Cozyhomecozyheart.com painted and stenciled her master bathroom this weekend, and check out how beautiful it came out!

Idea 2: Lay Grout-able Peel & Stick Vinyl over the existing tile
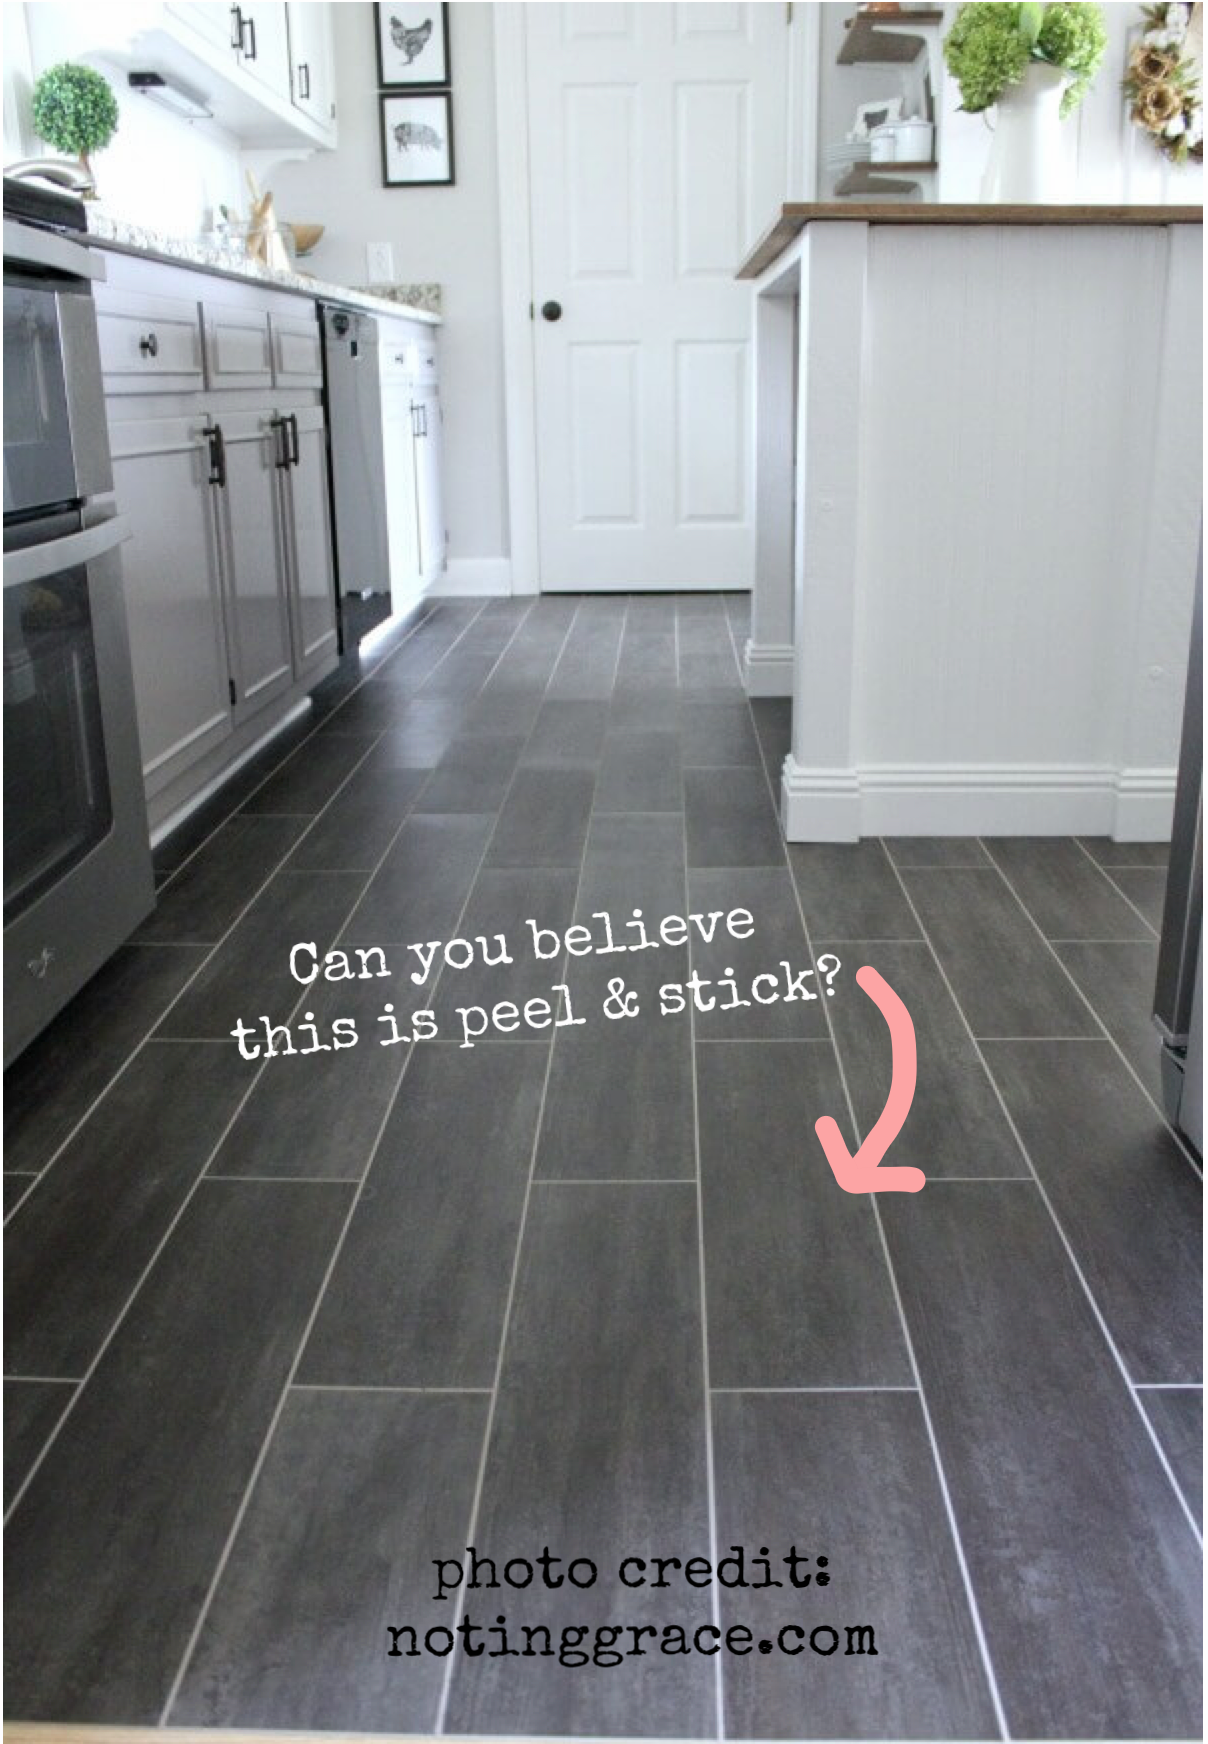
Vinyl Peel & Stick flooring or VTF, has come a long way from the vinyl tile flooring options that were popular in the 1980's. Available at stores like Home Depot and Lowes- these peel and stick tiles are available for less than $1 a square foot. You can lay them right over the existing floor (vinyl flooring or tile) and grout them for a more finished look.
What I love about it: The price is super reasonable and the look of the products have come a long way. When I researched this I came across Stainmaster brand vinyl wood-and in person many of these colors actually look like wood flooring. It adheres straight to the floor (after some prep work), and is quick and easy.
Why I didn't try it: I worried about how the VTF would hold up with the moisture of the bath/shower in this room. If it didn't hold up, I was worried about being able to remove this flooring from the tile. Then would I be left with removing the tile after all? However, Shad and I plan on trying this out in our basement when we renovate it this summer- because it is so cost effective. I'll let you know how it goes once we complete it.
**** Update: October 2018- We used the vinyl wood-look peel and stick flooring in our basement, check out the results and link below***
If you are interested, click ---> "DIY FLOORING: HOW WE CHANGED OUR KITCHEN IN 3 DAYS FOR LESS THAN $400"
Idea 3: Lay Pergo XP with Moisture Lock over the existing tile
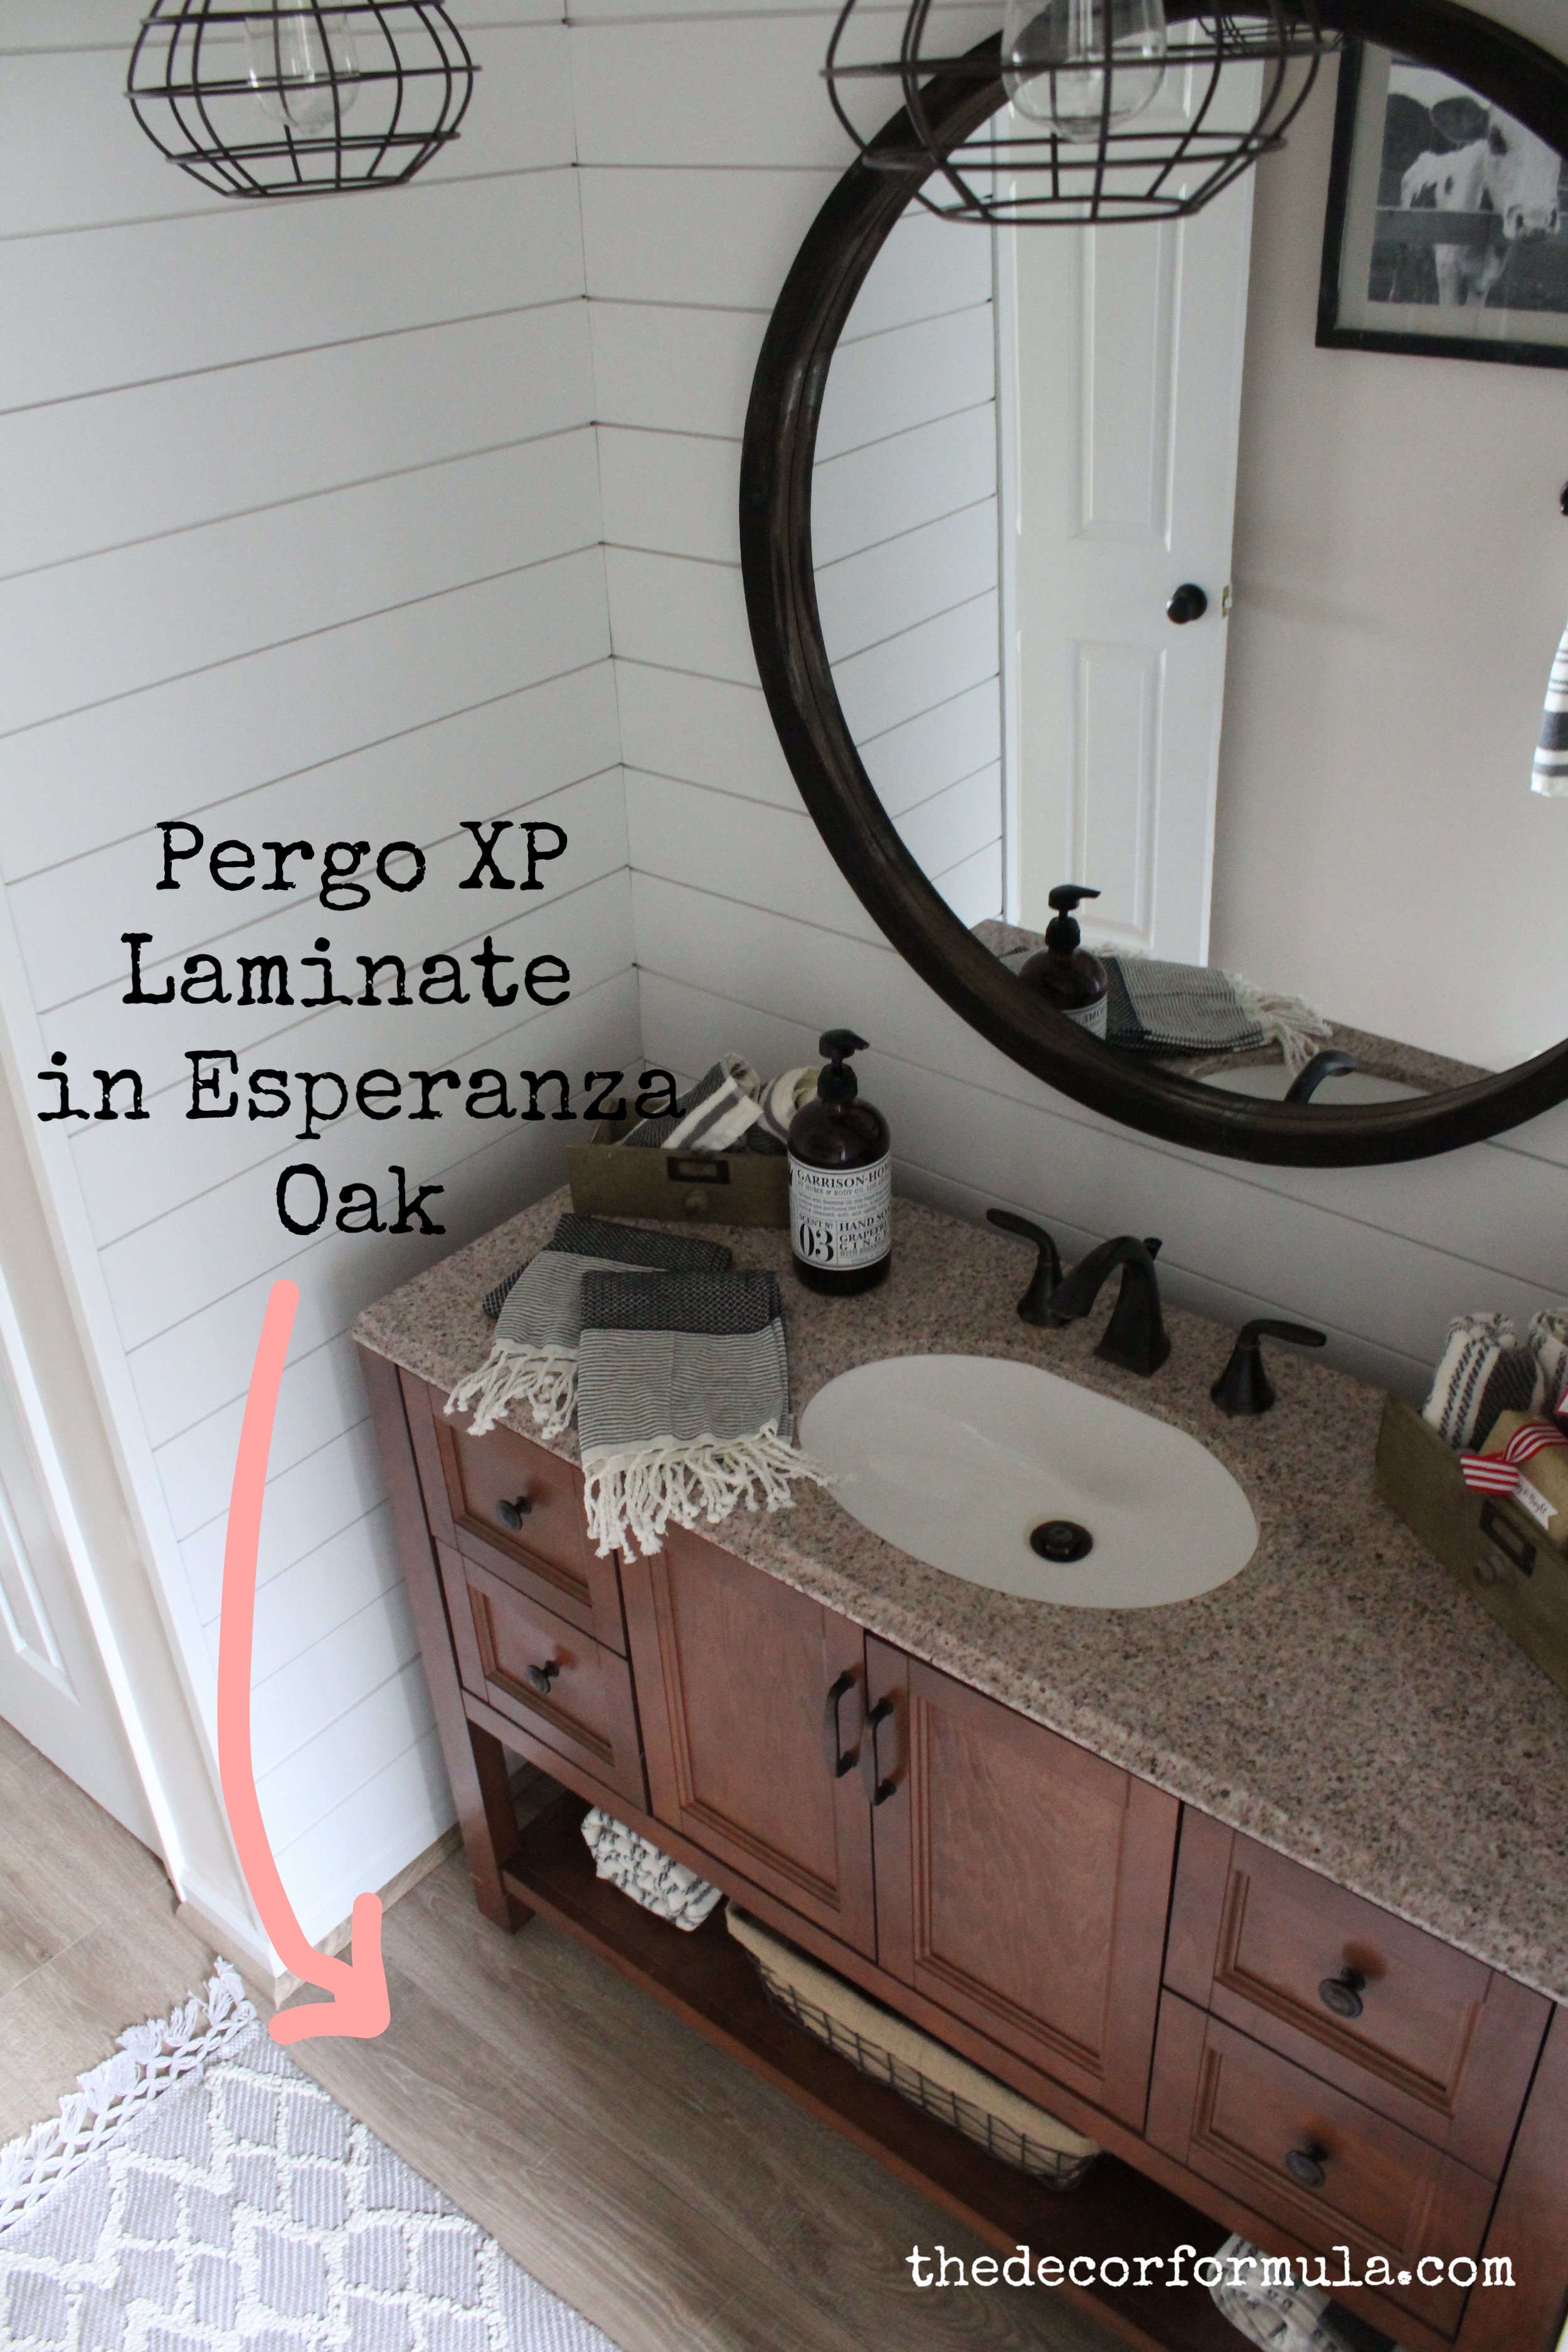
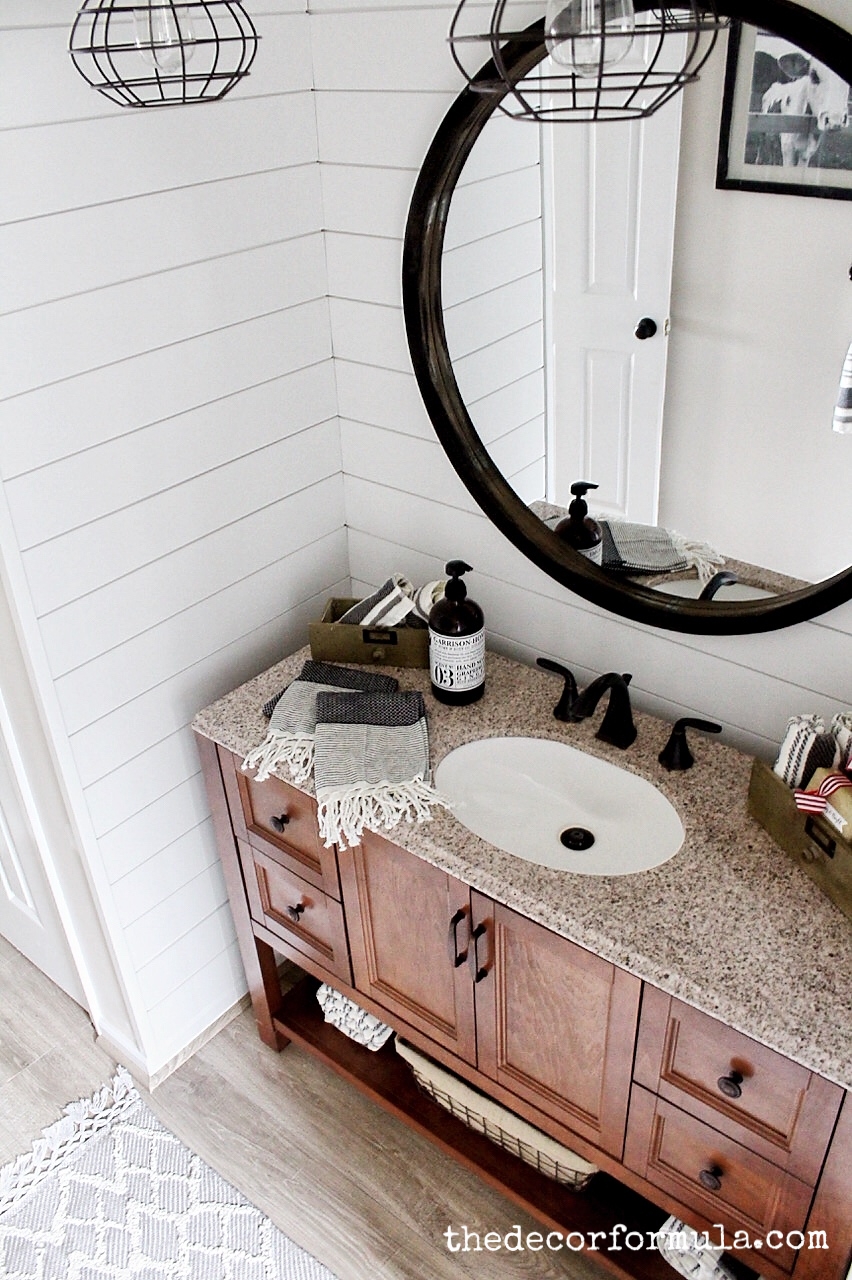
Ultimately, I decided on this option. Pergo XP is also sold at Home Depot and Lowes, and the product truly looks like wood. It was the most expensive out of the three options but I went with it for many reasons. Product and Tool links in bolded/italic words and buttons below.
What I love about it: The moisture-lock barrier of the boards that click together, helps to prevent water from guests getting out of the shower- from seeping underneath your boards. This material also comes with a vapor barrier already attached to the bottom of the board- so unlike other products, you don't have to lay a moisture barrier layer on the floor prior to install. It's an easy install (although it did take us longer than we expected because of how many cuts we had to make with the awkward layout of our guest bath). If you change your mind down the road or your ugly tile comes back in style, it's essentially sitting right on top of the tiles, so you can take it up at any time. Finally, it comes in many colors and has a real wood grain look to it- samples are available in the store to take home. Check out all the available color options by clicking on the link below. I chose this lighter color called Esperanza Oak, although our real wood floors in the adjoining hall are stained in dark walnut- because it goes better with our pre-finished vanity.
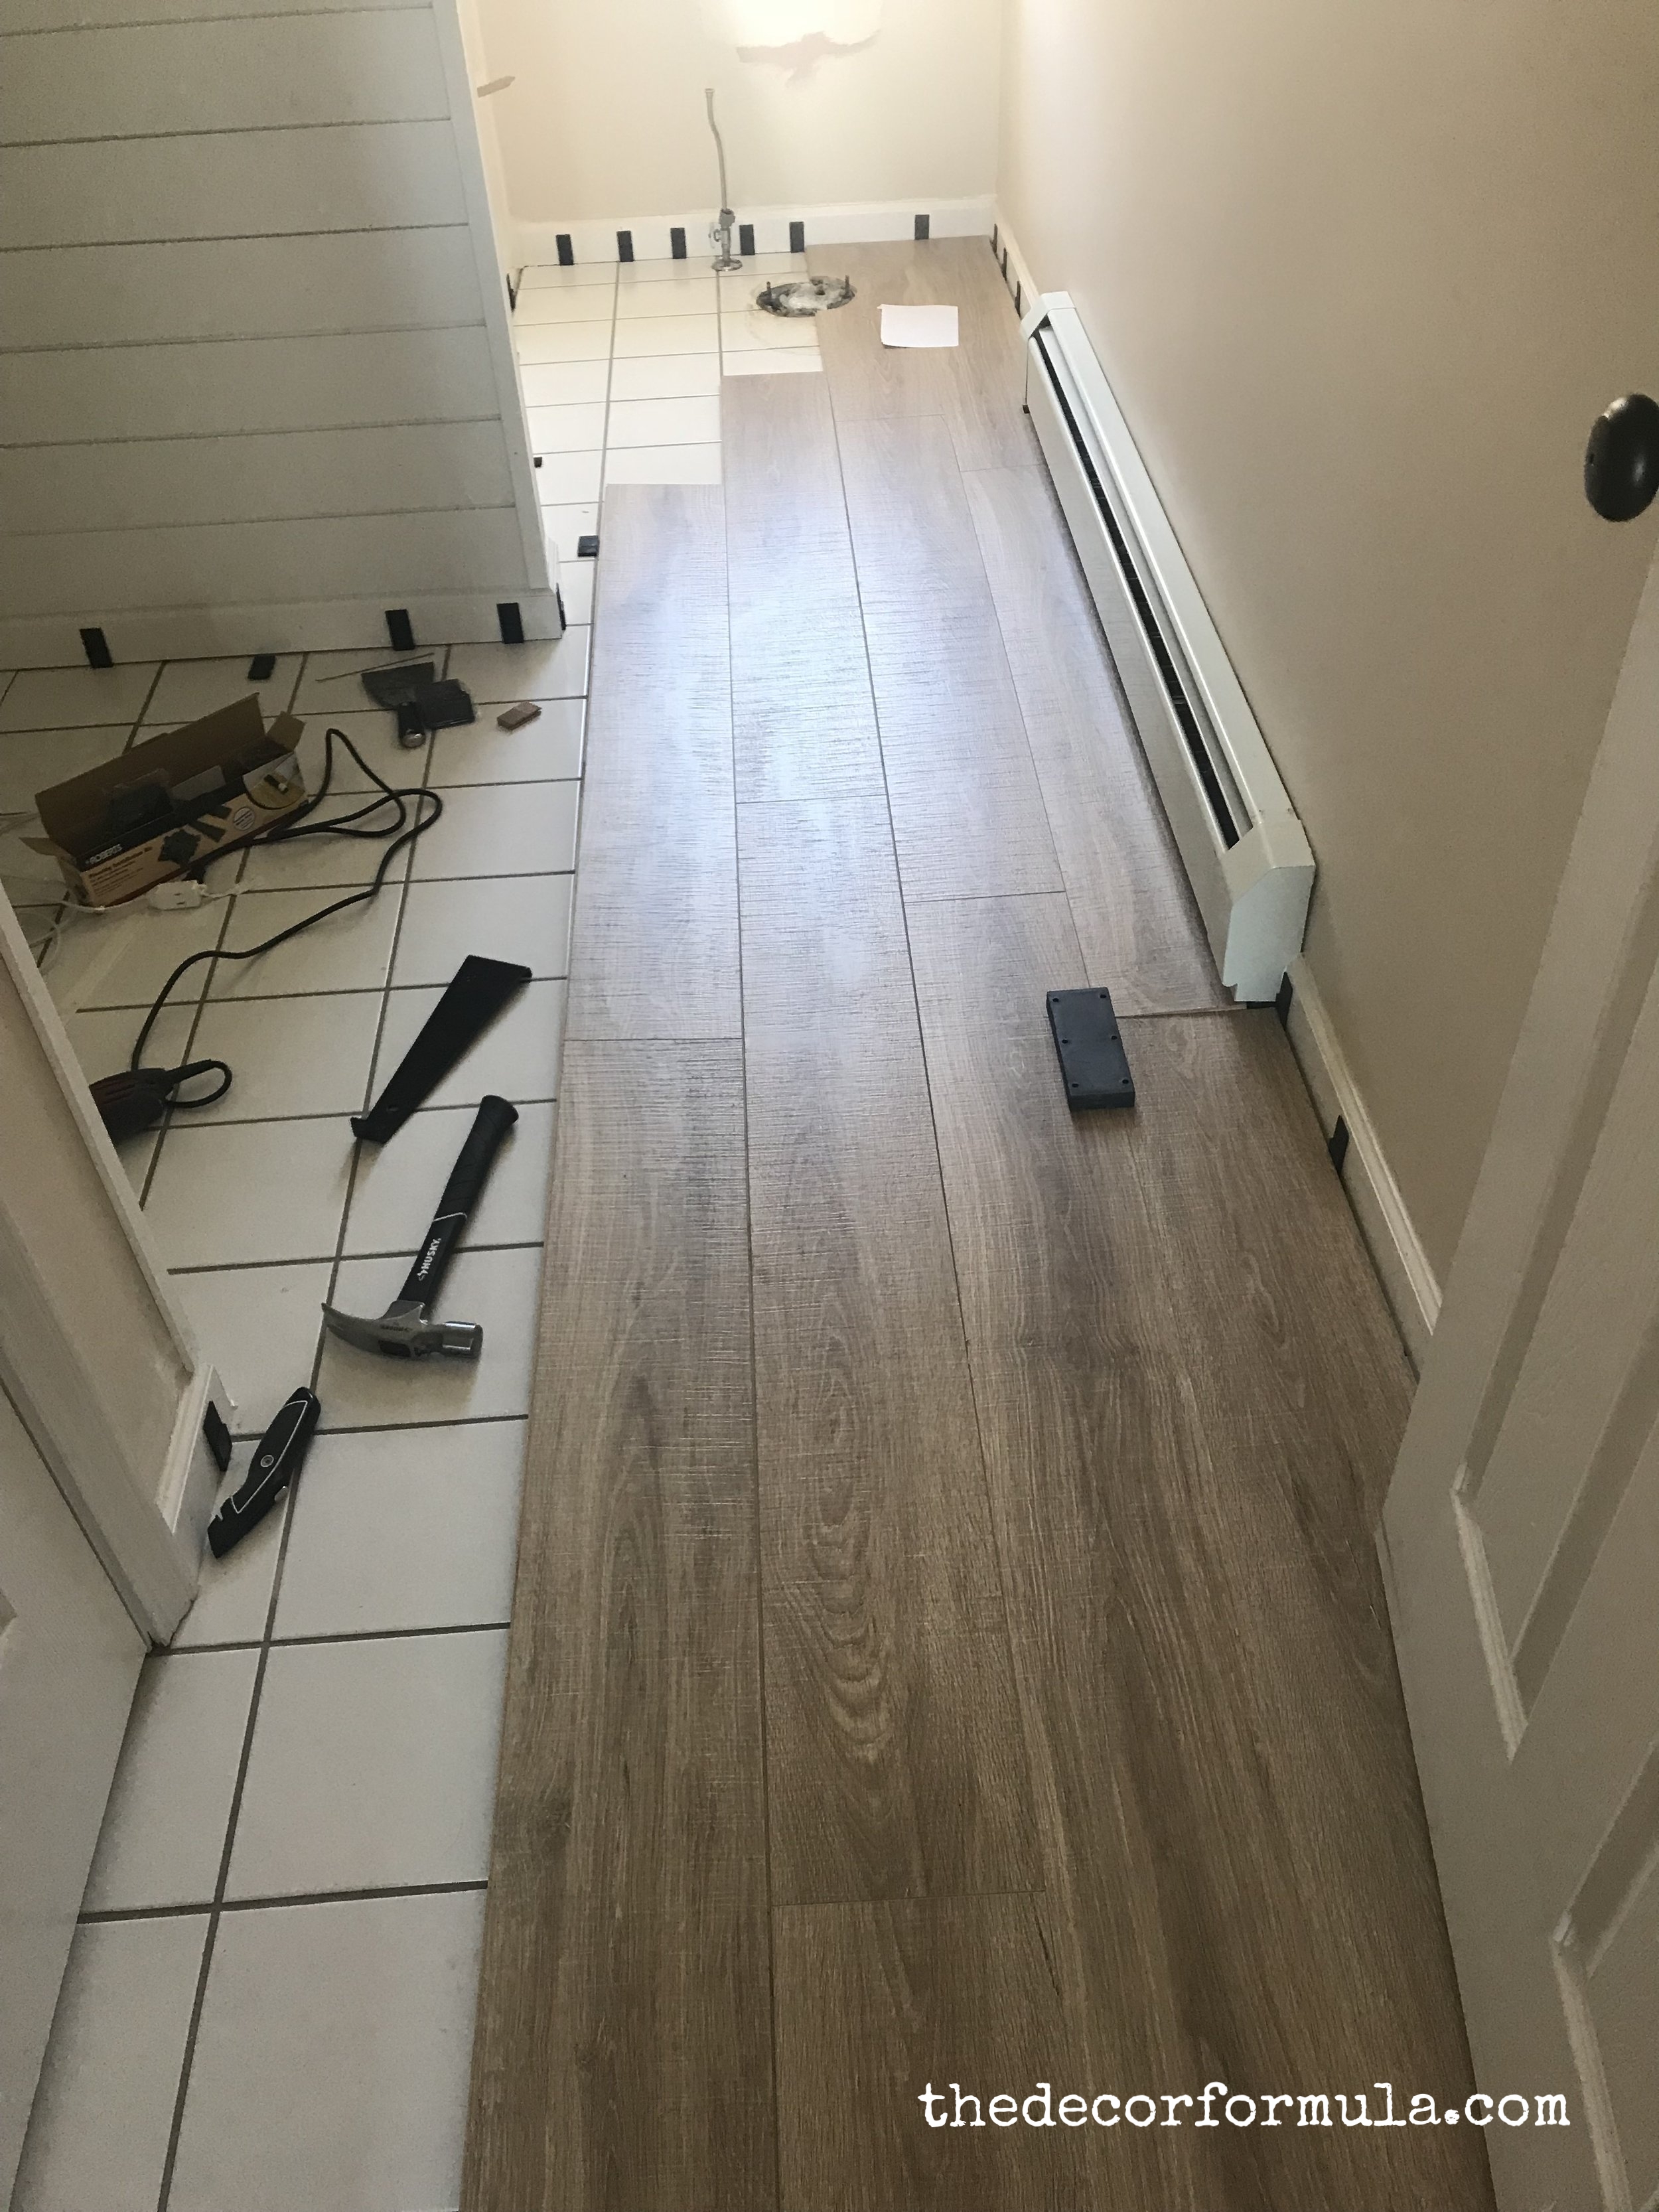
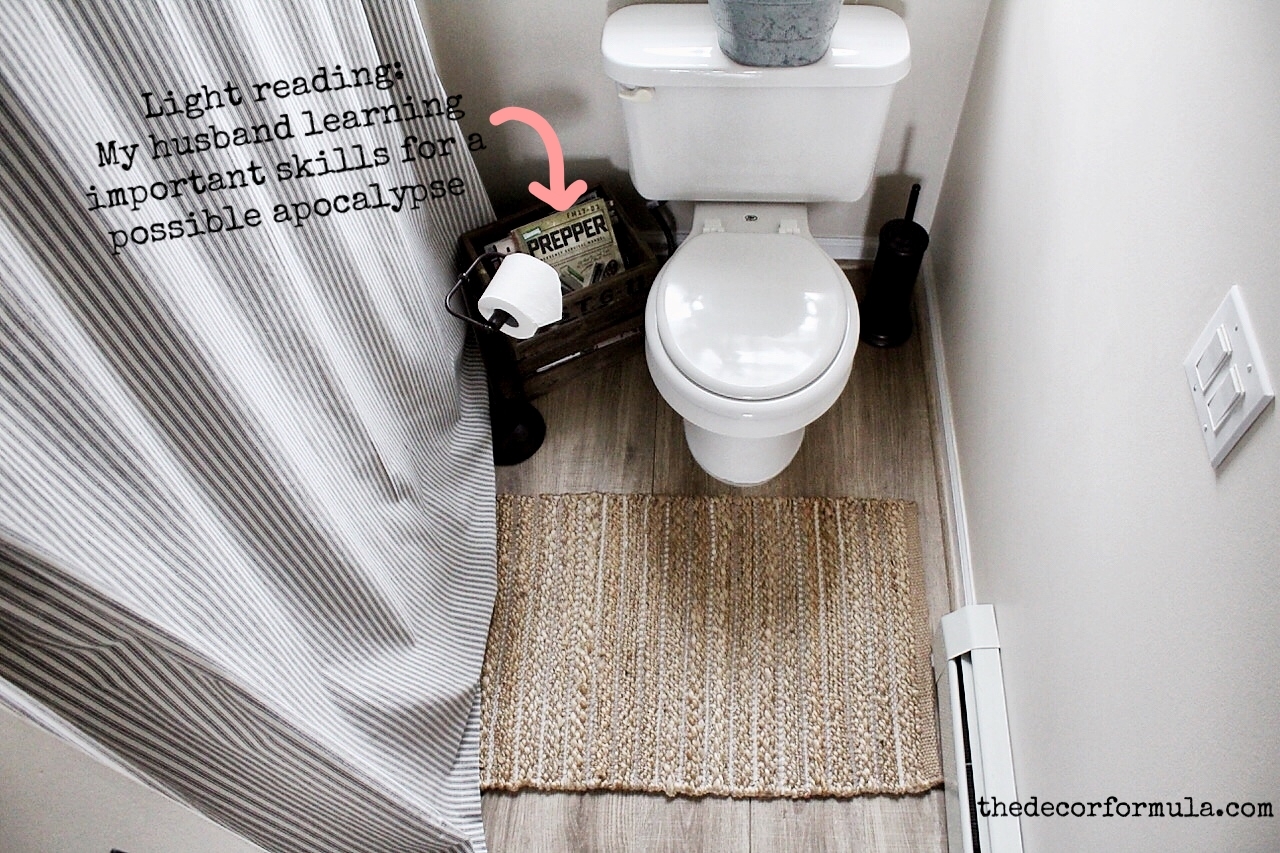
How we went about installing it: We first watched the installation guide video provided on Home Depot's website. We then removed the sink and toilet from the bathroom and vacuumed the floor. Using the spacers provided in a floating floor installation kit we purchased- we put spacers along the wall before laying our first board. Our first board across the wall- was cut down with a table saw in order to have a smooth edge. We laid the next board and clicked it within the previous board. We used a miter saw to cut the length of boards, an oscillating multi-tool when we got to molding, to cut the molding to fit the board underneath, and a jig saw to round boards for the toilet hole. Instead of removing the molding, we finished off the room by purchasing quarter round in the same color as the flooring, and cutting it to fit. We installed the quarter round by using a trim gun and air compressor, and finished off the room by using a silicone caulk to seal everything where the quarter round met the base molding, tub, and toilet.
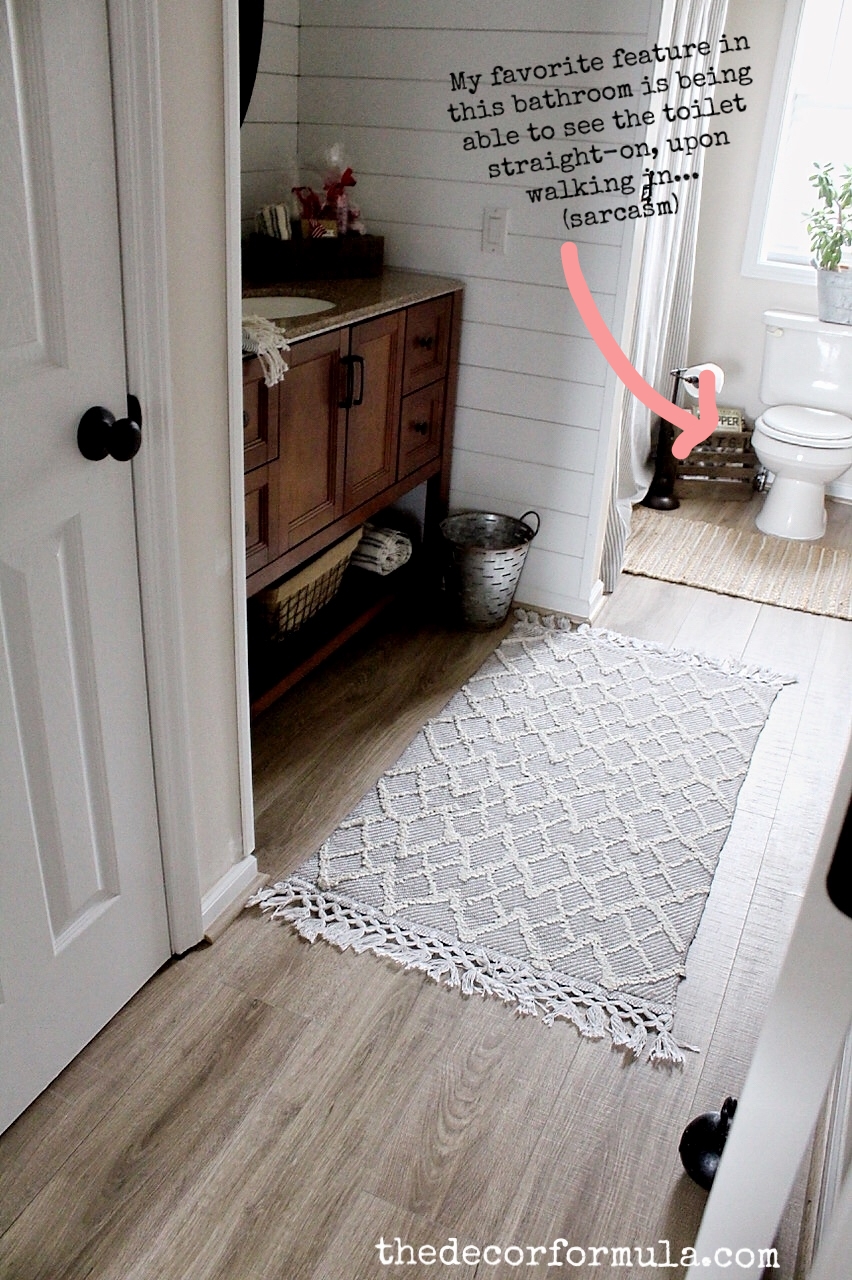
The result:

And there you have it...some ideas for a frugal fix to your ugly tile whoas.
Come back later this week for tips on decorating essentials to create a welcoming home!
Thanks for stopping by! If you enjoyed reading this post, feel free to share it with a friend or comment below.
<3 Barbra
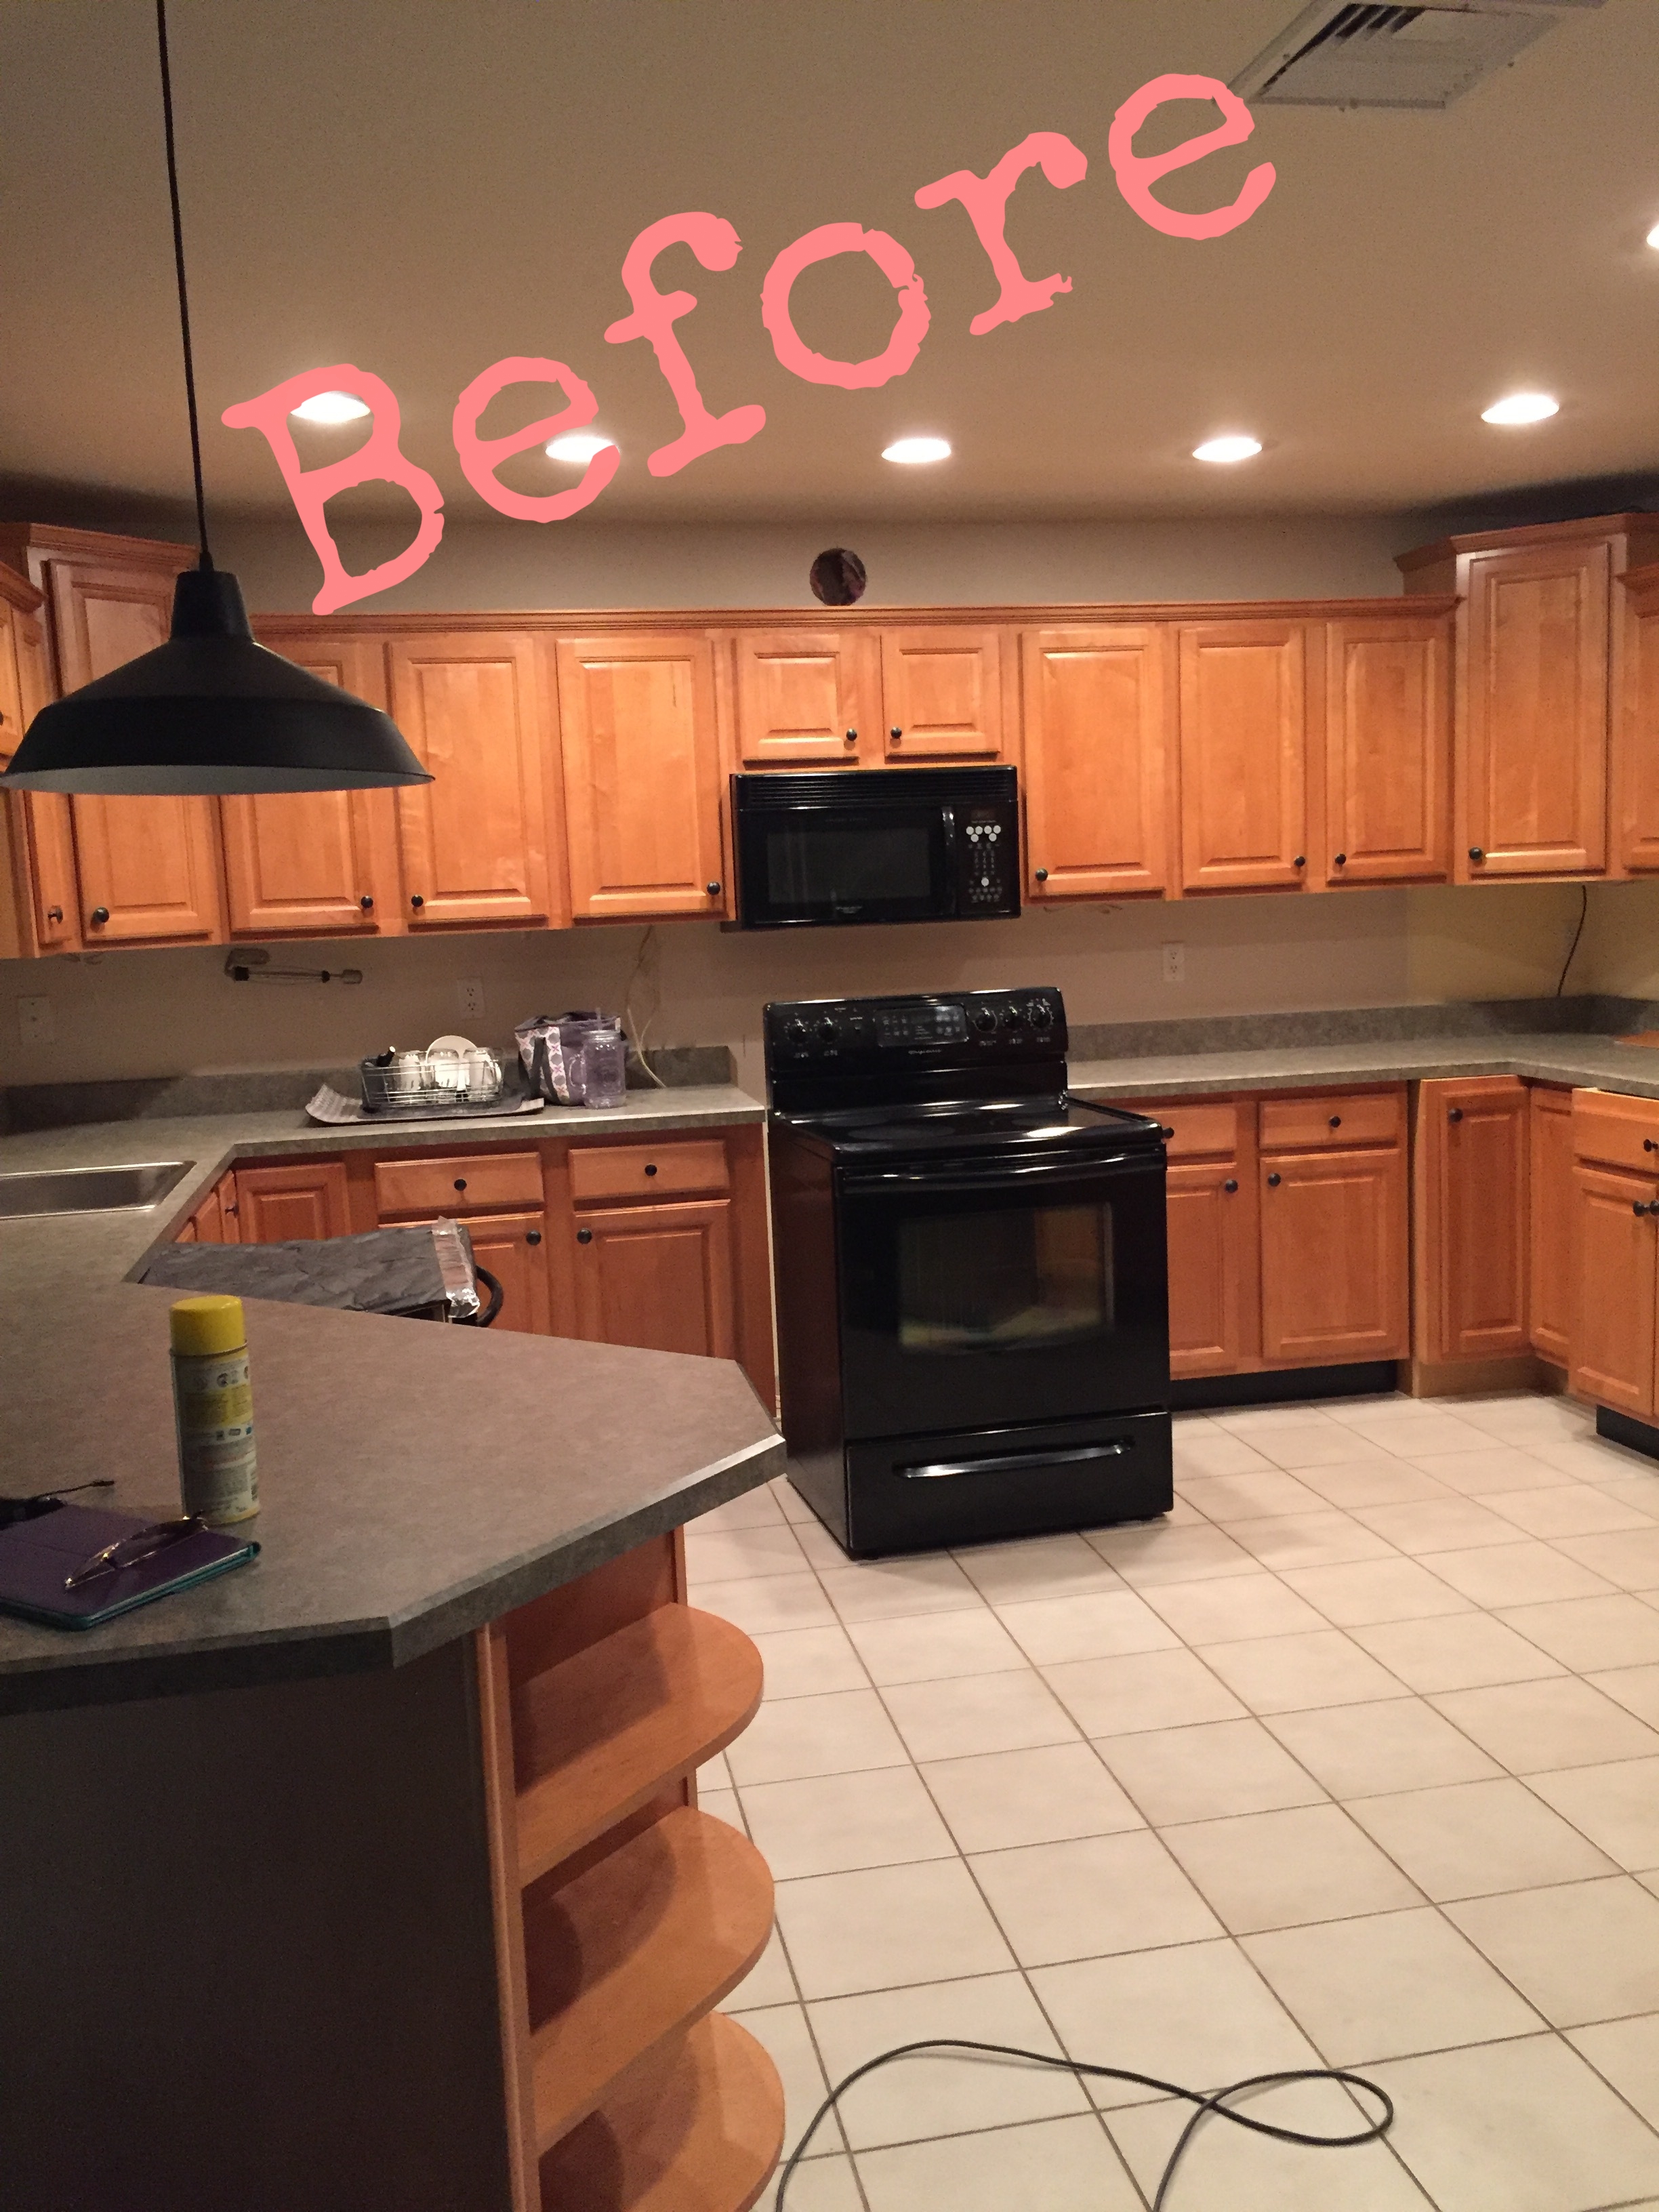
Update October 2018: We used a vinyl peel and stick flooring product in our basement after ripping up the carpet.
There was one part of our basement that had tile, and instead of ripping it up, we placed this product right over it. So far, so good, and we’re happy with the outcome of the look. I was also extremely happy with the price- at under $1 a square foot, it was an easy fix to our dated basement- an area that I wanted to look nice, but didn’t want to spend a lot of money. I recommend following the instructions, which included applying a primer on the original floor first, and renting a 100-lb roller to go over the tiles once you have laid them down. I also recommend in areas where you don’t feel that they will stick well enough- invest in a can of 3M adhesive. My brother recommended this as he use to build sets, and it worked perfectly.
Here is the product and check out the outcome:


Hey Friends, I spend a lot of time putting together these posts, and I would love it if you’d show some love back and followed me on Instagram. **** 10/2020: Recently my instagram was erased and I lost all of my following, so I would SO appreciate it if you followed me by clicking on any of the pictures below from my current feed. Thank you so much!! <3